
I love the classic look of a pea gravel path or patio. What I don’t like is pea gravel that gets everywhere, that washes away with every heavy rain, that hurts my knees because it’s too deep and loose to comfortably walk in. And if your neighborhood is anything like mine, the local wildlife includes a whole lot of outdoor cats, who tend to treat loose mulch, sand, and gravel as their own giant litter box.
I think I’ve finally hit on a construction solution that satisfies both function and aesthetics. My pea gravel path was put to the test yesterday when over 500 people walked on it during the Inside Austin Gardens Tour. This morning, it still looked pristine. Here’s how I did it:
First, get any current mulch or top dressing out of the way. Get down to bare dirt a few inches below where you want the level of your path to be. Tamp it like crazy. I cannot stress enough what a great tool a hand tamper is, and I wish I’d gotten one years ago, because it would have saved me from having to redo a lot of hard work.
Your bare ground:

Next, get some big rough gravel. You want lots of pointy edges that will interlock, and gravel heavy enough that it’ll stay put during one of our Texas downpours. Spread it a few inches deep, then tamp like a mofo til your arms want to fall off. You don’t want this layer to move.
Like so:


You could probably put your pea gravel over this layer. However, I want to be able to rake leaves and such without worrying about catching a rake tine on the gravel and pulling it up. So I topped off the tamped gravel with a few inches of decomposed granite.

And here I took a short break to check in with my supervisor, as one does.
 Some people tilt at windmills, other people battle feathergrass.
And here I would like to pause and offer a hot tip when it comes to using a hand tamper on decomposed granite: WD-40 is your friend. DG tends to stick to the bottom of the tamper in clumps and ruin the nice flat surface you’re trying to achieve. Wipe off the bottom of the tamper and spray it with WD-40. Problem solved. You might have to do this a few times if the DG is particularly moist.
Next, tamp that DG until it is flat and doesn’t move. Good times.

You can check whether your surface is level by spraying with water until it’s soaked and then noticing the low spots where the water pools. This also helps to pack it down.
Once I was satisfied that I had a smooth, hard, flat surface, I topped it off with pea gravel, raked it into a uniform thin layer, and tamped that too. Then I watered it in so that all of the dust would settle into the crevices. It was too dark for pictures by that point, but the result was very hard and flat and the pea gravel stayed put when I stepped from the pea gravel onto the mulch.
Here’s the view the hour before the tour started:

And here’s the view this morning:
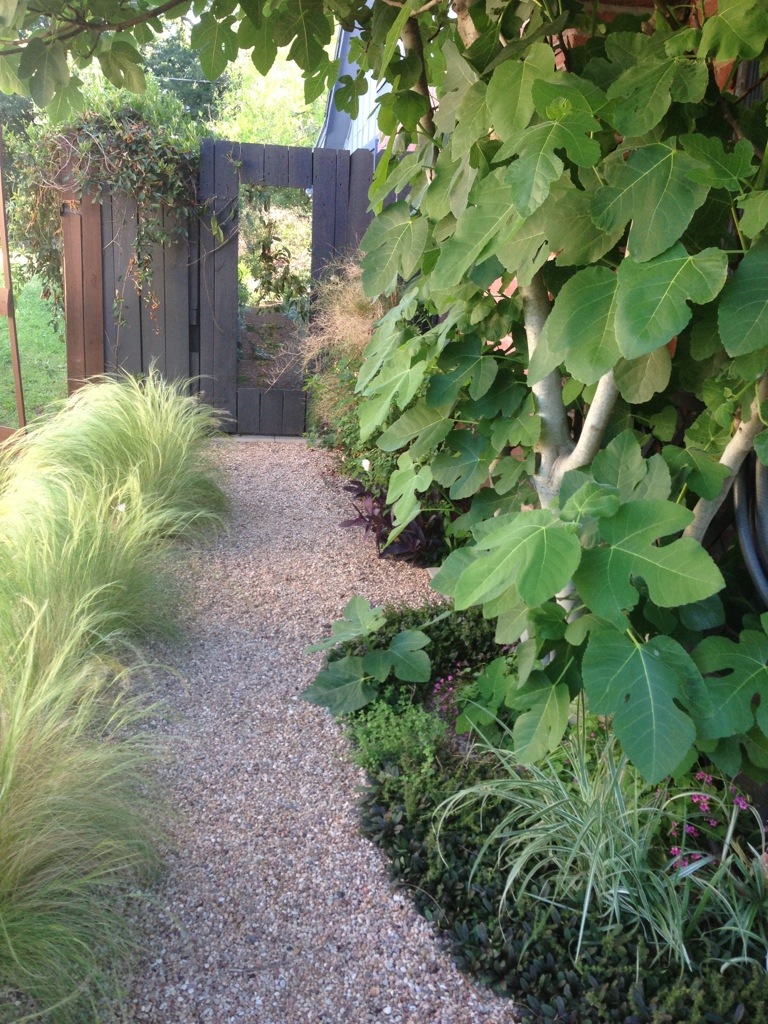
You would never be able to tell that so many people walked on it yesterday! Guess this means I’m gonna be redoing those random squishy areas of pea gravel that are left in the front yard…maybe in the fall. My arms need a break !

Good tutorial.
Glad all went well with the tour.
Thanks! I’m so relieved that it went so well!
Your decomposed granite looks like dirt? Someone told me I could use newspaper and cardboard in place of landscape fabric, and I’ve been saving it up for my path? Any thoughts about layeŕing?
Thanks for the how-to. I wonder how it works on a hill? I stopped by your garden on Saturday, but you were deep in conversation. My mother-in-law and friend were very impressed with your garden (as am I)
Thank you! I am so bummed by how many people have said they didn’t get a chance to say hi when they stopped by, but I’m glad everyone liked what they saw. I wonder if maybe the solution on a hill would be to terrace it? But on the other hand, that’s not a great solution if you’re like me and need to be able to haul stuff from the front to the back in a wheelbarrow. I’ve seen people terrace the path and then have a narrow gravel tamped path right beside, exactly wide enough for the wheel of a wheelbarrow.
I wish I could have been one of the 500 to visit your garden (500? wow). Great tutorial, talk about taking the time (and energy) to do it right. Your helpful hints (like the WD-40) will come in handy on other projects too.
I’m estimating the number of visitors based on ticket sales and volunteers eyeballing it, but another person on the tour had someone there specifically to keep count and his visitor count was 700! Crazy, isn’t it? I’m amazed that my lawn looks as good as it does. I hope that someday you can come visit and do the informal Austin garden blogger garden tour!
this turned out great, and what better way to prove a concept than 500 visitors? I dislike the orangey-ness of DG and this might be a feasible way to resurface all my paths. looks like i’ll be investing in a tamper!
I am not a fan of the DG color, either. I had it up front for a while, but it clashed like crazy with my brick. I tried pink granite gravel from Daniel Stone as an alternative, but it was too chunky to rake. I am not a fan of leafblowers and don’t have the patience to pick out leaves and other detritus by hand, so I’m glad I finally found a way to make pea gravel work. The only thing I forgot to mention is to make sure there’s some kind of edge to your path, so the materials don’t migrate or spread out over time.
Great idea Lori. I’m so glad to hear your garden came through so well under the stress of hundreds of visitors in one day. Your garden looked fantastic and we loved meeting you too.
Fantastic tip, Lori. Your path looks AMAZING after all those visitors traipsed through.
I had no idea it was so involved. I just knew that it looked really good when I saw it on the tour. Good plan!
Hi. I am so glad I chanced upon this site because I am currently right in the middle of building the layers of my pea gravel pathway. I had to stop because of needing to do more research due to the uncertainty on whether or not to lay black landscape fabric down in between DG and final top layer of pea gravel. The main purpose for the fabric, aside from adding another barrier to weed growth, is to keep pea gravel from sinking and mixing in with the DG. However, due to a ton of professional blogs advising against these landscape fabrics in flower beds ( I have decided to heed the advice and not use fabric in flowerbeds anymore) but have started to question whether I should still use it for the pathway. I would appreciate any advise you could offer regarding using black plastic barrier between DG and pea gravel. Thank you ery much.
Definitely avoid the landscape fabric. It doesn’t work. I’d also heard that for years and years from fellow gardeners and landscape professionals, but I decided last year to test it out under a gravel mulch in the backyard, just for my own peace of mind. I had just as many weeds show up as if I hadn’t put anything down at all. The fabric will end up getting in your way far more than it’ll end up helping. Skip it.
I put landscape fabric under my deck to all the edges. No weeds
The height of my deck is allows me to crawl on my hands and knees under the deck.
When we moved in 13 years ago, the area under the deck was full of weeds (I assume shade loving weeds), moss and thistle. It took allot of work to clean out. I wanted rubber mulch so I would never have to do it again. Not in our budget, so I groused while carefully placing landscape fabric with lots of over lap and lots of lawn pins.
I only have to redo it now because I started storing wood and gardening items under the deck, which disturbed the edges.
How is raking leaves? easy? can you also use a leaf blower and not disturb the gravel?
Raking leaves is super-easy! I have two different leaf rakes I use, a plastic one and a metal one where you can change the distance between the tines, and they both get the job done. I used a leafblower on it for the first time last week, and it worked fine on a low setting. You definitely do not want to blast a pea gravel path with a leafblower, though.
Hello – your path looks amazing, what a fantastic job. I am interested in doing something similar around the base of a tree in our garden. Nothing grows underneath it and the bark mulch that the previous owners put down to make it look pretty was spread and gone within a couple of weeks. I’m a complete novice but I’ve done a bit of research and I think we could use slate chippings or paddlestones but your path looks fab and if it doesn’t move it would be perfect as the gravel looks so warm and welcoming. I hope you don’t mind me asking but would you know if it would be suitable and provide enough drainage for the trees roots?
I have mixed feelings about putting pea gravel under a tree. On one hand, yes, it will definitely be permeable and let water get to your tree roots. I’ve noticed some mulches will actually mat down and repel water, which is a problem, as tree roots require both water and oxygen to stay healthy. On the other hand, you might need to do a lot of upkeep under a tree to keep the gravel looking clean, whereas mulch is much more forgiving on that front. I’ve run into problems under my crape myrtles because they’re so messy with their tiny bloom litter, and it’s matted down into the pea gravel between my rectangular pavers where it’s hard to get it out. If you have a tree with larger leaves that are easy to rake, I say go for it. If you have a really messy tree with small leaves or leaf litter like a mesquite, cedar elm, or crape myrtle, I think I’d stick with a mulch. If you’re concerned about the mulch not lasting a long time, I’d go to a place like Geo Growers or The Natural Gardener and take a look at the different mulch varieties they have available. Something like a coarsely shredded cedar won’t compact and will also take much longer to break down than something finely chipped from a softer wood that will decompose fast in the elements.
Hope that helps!
Thank you so much for your reply – I’ll look into the options you mentioned and let you know how I get on – I really appreciate your help.
Thanks so much for the detailed info and pix. I’ll be putting this to good use in the spring.
Oh, and my supervisor and yours could be twins!
Hi, Do you think I could follow this same process to fill a 10×10 patio area? Or do you thing the patio would be too unstable for a table and chairs? We currently have a large dirt patch that used to be a garden and I’d like to make it more functional. Thanks!
You can definitely use this process for a 10×10 patio area. That’s a lot of area to hand-tamp, though! You might want to rent a mechanical tamper for the job. Just make sure you tamp thin layers to really pack it down, and make sure to angle the surface of your patio slightly to make sure runoff drains away from your house foundation. You’ll also need to define the edges of your patio with something like metal edging or stone blocks so that your tamped gravel stays solid at the edges, and make the top of your patio flush with whatever edging you use so water runs off instead of pooling during a downpour.
Wow – just getting caught up because for whatever reason I never realized that your blog changed, and my blogroll isn’t keeping up (I’ll need to look into that tonight). I think I need to do some project in my yard very soon like…and I feel like it might possibly require the use of a tamper. Good times.
So late, but if you need to borrow my tamper, you’re totally welcome to it.
This looks really great. Do you remember what type of rough gravel you started with?
I was in a hurry, so I just used the pre-bagged stuff from Lowe’s and Home Depot.
Looks great! Have you found that cats use the pea gravel as a litter box? Thanks for the tutorial.
Nope. There’s not enough loose gravel for them to dig. There was one area where I dumped an extra bag of pea gravel on it, and I had to take it off because once there was more than an inch of loose gravel, it was a kitty magnet.
The key is to have a thick layer of tamped gravel as a base, so they can’t just dig through it. The pea gravel is purely as a decorative surface.
I think you have solved my problem, but I have a question. I recently had a large area graded for a patio area. I am using rainbow gravel (bc I like the colors). The guy who did the work didn’t compact the area and now I sink when I walk. If I add the DG and water it in and then use a plate compactor, am I going to get similar results? The patio is bordered by my house foundation and an “L” shaped sidewalk. Thanks in advance for any suggestions … love your garden!
Sorry, I just saw this comment! Pea gravel doesn’t really compact because it’s too smooth to lock together, so renting a compactor isn’t going to do much, even if you mix in a bunch of DG. What you need to do is take off the pea gravel, compact a good base for it, and use maybe an inch of the pea gravel over the top. Plate compactors are awesome, though. They make the job go MUCH faster. I am using a gravel and DG base tamped with a rented plate compactor on my current job, and it’s worked really well and stood up to a few monsoon rains. We’re adding pavers and then more DG and then pea gravel this weekend. I’ll post some pictures when we’re done.
Easy solution that I have tried is using an adhesive called ‘Mulch Glue’ part of a product line called Hippie Mulch where they offer an easy to use binding solution. I have found it keeps mulch in place but also pea gravel!
I have often seen pea gravel for sale in Lytham and been unsure what to do with it, but this is very inspiring! Thanks!
Thanks for the instructions and tips…love your supervisor, too!
I’ll be putting your tips to use in my yard in So Cal shortly! Thanks!
Just to let you know I’m a long way away in Australia and this is helping me … thanks (strangely my daughter just did an exchange semester at the University of Texas in Austin …small world)
Very cool!
Would you recommend placing a raised bed for square food gardening on top of the gravel?
I’d put it on the leveled DG layer instead.
My husband and I are trying to educate ourselves before we get out and start adding pea gravel. Thanks to your post, I feel a lot better about getting started.
You’re welcome! It’s still as solid as the day I did it.
This looks fantastic! Do you think it would work for a sitting area around a fire pit? Or would it be too hard? I’m an inside DIY-er, dying to do a cool fire pit area below my back porch!
Have a great week! Thank you, Lisa (central Ohio)
It would totally work! Go for it!
Love the humor:) good info too! After work today (office work), I shoveled an entire truck bed of compost into our wheelbarrow and pushed them to the flower beds in our back yard and unloaded them. I can really relate to the arm workout (and back!).
It has been a few years since you put this walkway in. May I ask how it has held up? I am about to do the same. 🙂
Hi, great post… I love the pea gravel and was hoping it would be good for a short driveway in my little getaway cottage upstate! But as I was spying your photos, i noticed you have a doorway in a door. That’s not a mirror, right? Why do youhave that there?
Are you referring to the mesh screen in the door? It doesn’t show up well in pictures. (It’s a cheap piece of galvanized plaster backer.)
Hi, I was impressed with your info. I have also researched other ways of applying pea gravel. I have a small dogwood tree and a huge maple tree in the area where I want to create a pea gravel patio. I can”t dig down deep enough anywhere in the area I need to put the patio due to the tree roots everywhere. One site said all I would have to do is lay landscape fabric and then 2-3 inches of pea gravel to achieve the patio. (of course I would have a substantial border laid out also. I’ve thought of decking but it is so expensive. What are your thoughts?
Thanks very much will try in London.
Pingback: DIY Garden Paths And Backyard Walkway Ideas | The Garden Glove
I really enjoyed your post. Hopefully I will have great results like yours. Your plants look great too.
Hi – wondering how this has held up? Also – did all those layers prevent weeds from coming through? Would you suggest adding a layer of land scrap fabric?
Thank you, this is so very helpfully 🥰. You did an awesome job.
Hi – this is great! I can’t tell what kind of edging you have – it looks invisible! Can you share? I’m trying to decide what kind of path to put in and this is very helpful.
Pingback: Bluestone Backyard: The Big Reveal! – Intact Review
Pingback: Bluestone Backyard: The Big Reveal! | My HomeAdvisor
Your finished gravel looks much too rough and sharp to me – and so it will compact pretty solid. You need river-washed rounded gravel – pea gravel as it’s sometimes called.
Pingback: Bluestone Backyard: The Big Reveal! | Manhattan Nest
Pingback: Bluestone Backyard: The Big Reveal! – Plumbing Excellence
Pingback: Bluestone Backyard: The Big Reveal! - beast.edgypaige.club
Pingback: Bluestone Backyard: The Big Reveal! - House Remodeling Blog
Greetings:
Great job, I learned a lot, and I’m about to replace all my old wooden walkways, so this will come in handy. What about rainwater pooling on it? Or is it permeable and water just drains through it?
Thanks again.
Hi there,
I was wondering how your pea gravel path is doing since it’s conception six years ago. I happen to also be interested carving out some sizable beautiful pea gravel paths through my property and was still unsure how to proceed until I stumbled over your article.
Has the surface remained intact or not? How were you able to clean garden debris fallen among the gravel ? Do you still like how the project turned out and why ?
Any information you can give I totally appreciate it.
Thanks so much in advance,
Ligia from San Jose, California
I’d love to know the same…and if new pea gravel had to be added to the surface after time. I’d love to see the picture of the pavers that were added as well.
Pingback: Backyard Ideas on a Budget - Spruce Up Your Garden • The Budget Decorator
How has the path held up? Im thinking of adding pea gravel over my backyard but id like to know how it holds up. Also, how many inches did you use?
Awesome! Great tutorial & exactly what I needed! I was debating whether to lay landscape fabric, but thought the gravel layer wouldn’t compress/compact as well, making it more likely to loosen and dislodge, over time. Thank you for taking the time to educate and help others, much appreciated!
Pingback: Best Materials for Creating a Backyard Walkway
Pingback: 26 DIY Garden Path Ideas To Make Your Own Garden Heaven
Pingback: 9 DIY Small Garden Ideas For Your Home - DIYS
Pingback: Percorsi Da Giardino Fai-da-te E Idee Per Passerelle Nel Cortile • Il Guanto Da Giardino - Ats-attagono
Pingback: 11 DIY Small Garden Ideas For Your Home - DIY & Crafts
Helpful! Never heard of DG but will have my eyes and ears out for it. Plus a tamper!